Wednesday, 3 February 2016

Blobbing Along!

Blobs First Appearance!


From the beginning of these 4 months, starting with a concept drawing of Blob from a primary school child, to me re designing, building and animating the character, there has been a lot of obstacles I have had to work around.
Some that I loved to problem solve and other that made me want to go mad!
But I can now show Blob in his own final 18 second animation!

Enjoy!


Post Production!

2 Weeks of No Daylight. Now it's On To Post Production!


As you may guess the end is near!! Woohoo!
4 months work, near completion.
The only thing left to do was remove the blue screen, and create a background.

First I used a pen tool to remove were the rig could be seen in the film. Luckily I managed to hide a large portion of the rig behind the lectern.

Once I had drawn around the rig, I could then go frame by frame, animating this mask to remove the rig from the animation, as you see from all the key points below.  


Once the rig had been removed, I then went on to design my background in photoshop.
I wanted something in the middle of cartoon like and realistic, to fit in with Blob.
I managed to come up with this simple background.


The next step was to import it under my animation, and with the blue screen and rig hidden I began to see Blob in his environment.


I few tweaks and added masks had to be made with the flooring and Blob's crocs. As the crocs were blue they got removed with the blue screen. To fix this I had to cut the animation in half, where the carpet meets the wall, and then place a copy of the original animation under neath this. This then showed his blue crocs.

In the end I had about 10 masks on the go!
That's a lot of masks!
You can see the positioning of many of the masks below.


Once my background was in place, I had some little time left over before submitting my animation, therefore I decided to add a flame to the candle!
This was done much easier than you think.
I first gathered some free stock footage of a flame flickering.
I then cut around that, rescaled it and then put it on top of my candle!


Finished Image! 


Tuesday, 2 February 2016

Sets, Props and All That Hoo-Ha


Character Done, now time for sets and props!
First I started with the podium/lectern, whatever you want to call it :)

This was all going to be made out of balsa wood, so I began with the base. 
This was a piece of square balsa that I cut and then rounder of the edges and corners.


*Poof*, we have a lectern!
I bet from the first image you thought this would be a step by step of how I made the lectern. 
You were wrong, sorry.
I completely forgot to take photos as I was building, I was to surprised that my lectern was staying up at the time!
But here it is, at the stage I remembered, I hadn't taken a photo in a while!


The lectern looked rather bare therefore I added K+S round tubing to the side, which will later act as a candle holder!


The lectern was basically finished so I moved on to his mother's portrait. I wanted something in my animation to show that he was at his mother's funeral. 
My initial plan was to have a comedy look, of a coffin with maybe a sculpt of her inside.
But that would've taken to long, so I then opted for a picture.


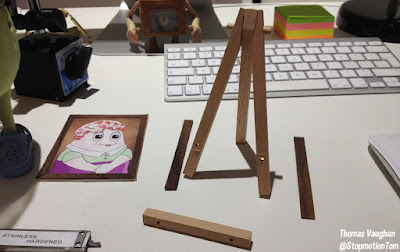
With the Design finished. I needed a stand for it to sit on.

Luckily I decided to go in to a new shop in Cardiff one weekend and when looking around I saw these mini canvases.
This immediately set off a light bulb for me to use this as my picture stand. The canvas stand was very small, therefore I had to dismantle it and then reposition the picture ledge higher up.  


Darker Balsa wood was added on to the legs of the picture stand. As well as a different gradient of wood on the front of the podium, and a new added feature of a candle!


The scene looked very dull and bare, so I decided to create a wreath to put infront of the picture. 
This was done by "borrowing" this ..... 


.... (I don't know what you call it) from my girlfriend. This had wire inside which allowed me to twist it in to a circle.
Also a big thank you to my girlfriend again who managed to find these flower hair band pieces from "Claire's" (a shop in Cardiff)


I then began plucking all the roses off of this band, as seen below...


And then arranged them on to the wired circular thing.
Which then made a wreath! 


Everything was now complete, I had my character, the props were made, all was needed was to head on in to uni to put up my set. 
My set consisted of red felt rolled on the animation table.... not the most technical, but it worked! 
You may see the metal animation table on the side of the screen but this will be replaced with wooden floor in post production! 
Good ol' computers!


With everything finished it was time for me to confine myself to a small corner, and go animate! 

Bye! 

the simpsons bye lisa rolling hill

Finishing the Head... and Blob!

Blob is nearly complete!!!
Just his scarf to do..
 I lie 
I've decided to correct things again!

During casting all the body part I painted the head, once everything was finished I decided to assemble Blob...

Not good! 
The head tone is much darker than the body.
I decided to roll out some plasticine to act as a scarf, to allow me to see if the colour change is noticeable with something separating the head from the body and it is! 
Poop!


So what did I do? 
Well ripped the eyes out of the head of course! 
There was a method to this. As you can see from the image below...


The paint job wasn't great! As I could not remove the eyes whilst painting, painting around them become very tricky. Paint started to become blotchy around the eyes and also green kept going on to the eyes!

Therefore I managed to pick these out with a pin and they were stuck in there pretty good, and I then binned these eyes and decided to make new ones. I coated the head with white primer again and started paint a new shade of green on top, without the eyes in.


This proved a lot more effective! With a better green but also the finish was up to a standard which I wanted. Plus I did not have to worry about the eyes.
Once the painting was done I then, baked the eyes again, coated them in primer, and then a clear gloss on top.

The Scarf


Next was the scarf!
I got some material from John Lewis
I know fancy, right? Only the best for Blob.


I then took some paper card and measured how much of the material I would need to go around Blob's neck.


Once I had this measurement, I used a scalpel and cut  a piece of the material.
I then used fabric glue to fold the fabric over the card and secure it in place. 
The reason I kept the card inside the fabric was to give the scarf shape and strength, to hold around Blob.


For the piece of the scarf which would be hangin over Blob's stomach, I thought it would be nice to add wire within this to try and get a bit of secondary movement whilst animating.


Super glue was then used to secure the scarf to the head, and then fabric and super glue to stick the 2 bits of scarf together!


The Scarf is Done!! 


The last piece to add to Blob was his plasticine eyebrow and he was complete! 


And Here is Blob!!!


Peanuts applause yay cheer cheering


Casting Blob: The Body

Last thing to do in the casting part, is casting the body!!
Ok I can do this! 
To start
I had to make casts of the tops of the legs and tops of the arms.
This was done to go into to the mould of the body, with the body's inner core, so when the cast of the body is removed I would have holes in the body, which are the perfect size for the legs and arms to fit in to!

If I did a terrible job at explaining that I have some photos underneath to illustrate this.


Miliput was used to create the cast of the top of the leg, the same was done on the arm. 
I applied vaseline within the mould before inserting the milliput to ensure once the milliput had dried, I could remove it again!
Body core with milliput plug things, underneath!


I then began the casting process of painting a layer of silicone in the mould. 
K+S was inseted to ensure a gap was made for a riggin point later.


Once this was set I then placed the armature in side
and poured in the silicone and clamped shut.


Below you may see the mould balancing on 2 bins, this is due to the long piece of K+S at the back of the mould, and placing this flat on the ground would send the armature flying out of the mould. 


It casted just how I wanted it, with belly button and all!


I then tried to do the seam lines however the silicone again began to tare, therefore I had to stop. I am not to worried about these though as the arms will be covering them.


Casting Blob: Hands, Crocs & Legs

On to casting! 
To start we need colour,
I measured out the amount of oil paint needed on some scales to ensure if I needed more I knew the exact amount of green and white needed to get my colour.

Green and white oil paint is used to colour the silicone, which I got from an art shop close to were I live. 
Unfortunately the silicone I used was a very cream coloured silicone which meant getting the green I wanted proved tricky, with me adding a lot more oil paint in to the silicone than I wanted!!


Hands

Once I got my colour, I started with the hands. I painted in a thin layer of silicone in to the mould, and allowed that to cure before casting the arm. 
This is done to ensure I have a layer of cured silicone in the mould before casting. This helps with limiting the amount of air bubbles you get in a cast, and also when putting the armature in for casting, you can be assured that the armature will not be to close to the finished cast, as a barrier of silicone is already cured beforehand. 

If that makes any sense! 


I then placed my armature inside, poured silicone in, and clamped the mould together and waited!


These are how the cast hands came out, I was happy with them and went to take the seam lines off!


This is were it didn't go so well! I tried to remove the seam lines with small scissors to start, and then move on to a dremel. 

Unfortunately, be it the type of silicone, the amount of paint I added or my terrible craftsmanship, the silicone began to rip, I then had to stop with the seam lines and keep them how they were. Hopfully on camera the tears won't be visible.   


Legs

The Legs were very simple and quick to cast, with not much to say!
I began by filling up both halves of the mould with silicone, as a K+S hole was on the top of the mould this ensure the armature went in straight. 
Once they were cast, they slid out easily!


Crocs

The same process was applied to the croc as the hand casts. Silicone was painted in, once that had cured, the armature was put in the mould. Silicone was then poured in and I then closed and clamped the mould and waited.


I was nervous with opening this cast as I didn't know if the holes in the croc would work, or snap once i removed the croc. 

I opened the mould to see the sole of the croc worked nicely! I then prayed the top looked as good!


The croc was removed easily and the inverted holes in the crocs turned out great! Which I was very happy with!


With the croc finished I could now move on to the casting of the bands. 


These were simply poured in to the mould and left. Once cured, I could peel them out, clean up the edges with a scalpel and they were then stuck on to the croc with dots of silicone acting as super glue, as silicone sticks to itself very well.